In this project, I made a simple real-time DSP (Digital Signal Processing) project using ARM Cortex-M3 (STM32F013C8). The signal processed in this project is audio signal that come from electronic devices through 3.5mm audio jack. The audio signal is processed using STM32F103C8 microcontroller.
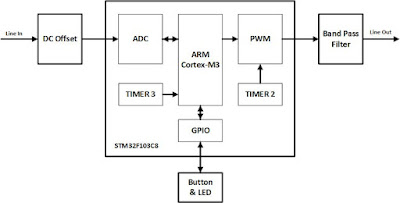
There are 3 simple audio effect that implemented in this project. These effects are low pass filter, pitch up, and pitch down. The audio output from this microcontroller is sent to an active speaker. This is block diagram of this system:
The first part of this block diagram is an input circuit. The function of this circuit is to give a DC offset to the audio input signal. This is required because the audio input signal is AC signal that consist of negative voltage and the ADC can't read negative voltage. If you want to know the detail about the line output voltage of this audio signal, you can learn from here. The audio output from electronic devices usually a stereo output (left and right channel), but in this project, for simplicity, I will process only one of the channel (left or right). The output signal from this circuit is AC signal that oscillated between 0 and 3.3V that ready for ADC input on STM32F103.
The second part of this block diagram is a microcontroller module (STM23F103C8) that will process this audio signal in real-time. The ADC is required for sampling the input signal with the resolution of 10-bit. The timer 3 is used for generating interrupt for sampling and processing audio input signal at the rate of 35.15kHz. The timer 2 is used for generating audio output using PWM. The PWM frequency is 35.15kHz and the resolution is 10-bit. Button and LED is connected to the GPIO. The button is used for select the audio effect. The LED is used for give indication when any audio effect is on.
The third part of this block diagram is an output circuit. The function of this circuit is to smooth the audio signal from PWM output before sent to the speaker. This circuit is a passive band-pass filter using resistor and capacitor. Nyquist's Theorem states that for a sampling frequency of x Hz, the highest frequency that can be reproduced is x/2 Hz. So, if your sampling frequency is 35kHz the maximum frequency that can be reproduced is 17.5KHz. This circuit is implemented using standard resistor and capacitor value that available. So, the low and high cut off frequency on this filter is set to 16Hz and 16kHz.
The third part of this block diagram is an output circuit. The function of this circuit is to smooth the audio signal from PWM output before sent to the speaker. This circuit is a passive band-pass filter using resistor and capacitor. Nyquist's Theorem states that for a sampling frequency of x Hz, the highest frequency that can be reproduced is x/2 Hz. So, if your sampling frequency is 35kHz the maximum frequency that can be reproduced is 17.5KHz. This circuit is implemented using standard resistor and capacitor value that available. So, the low and high cut off frequency on this filter is set to 16Hz and 16kHz.
You can calculate the cut-off frequency using this formula: Fc= 1/(2×π×R×C).
For the high-pass circuit: Fc= 1/(2×π×100×100u) = 15.915Hz ≈ 16Hz.
For the low-pass circuit: Fc= 1/(2×π×1k×10n) = 15.915kHz ≈ 16kHz.
For the high-pass circuit: Fc= 1/(2×π×100×100u) = 15.915Hz ≈ 16Hz.
For the low-pass circuit: Fc= 1/(2×π×1k×10n) = 15.915kHz ≈ 16kHz.
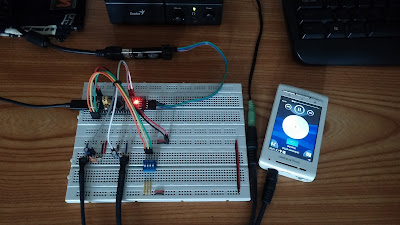
This is the circuit implementation from the block diagram above:
This is the code for the microcontroller:
#include "stm32f10x.h"
#include "stm32f10x_rcc.h"
#include "stm32f10x_gpio.h"
#include "stm32f10x_adc.h"
#include "stm32f10x_tim.h"
#include "delay.h"

#define LOW_PASS      0x1000
#define PITCH_UP      0x2000
#define PITCH_DOWN    0x4000

#define FILTER_BUF    9
#define PITCH_BUF     500

/* Low pass filter coefficient (frequency cutoff = 800Hz)
 * Matlab code:
 * N = 7; f_lp = 800; fs = 35156;
 * Wn = f_lp/(fs/2);
 * B = fir1(N, Wn, 'low');
 * freqz(B);
 */
const float filter_coeff[FILTER_BUF] =
{
    0.0200, 0.0647, 0.1664, 0.2489, 0.2489, 0.1664, 0.0647, 0.0200
};
volatile uint16_t adcValue = 0;
volatile uint16_t effect = 0;

void ADC_Setup(void);
void PWM_Setup(void);
void GPIO_Setup(void);
uint16_t ADC_Read(void);
void PWM_Write(uint16_t val);
uint16_t low_pass(uint16_t input);
uint16_t pitch_up(uint16_t input);
uint16_t pitch_down(uint16_t input);

void TIM3_IRQHandler()
{
    // Checks whether the TIM# interrupt has occurred or not
    if (TIM_GetITStatus(TIM3, TIM_IT_Update))
    {
        // Read ADC value (10-bit PWM)
        adcValue = ADC_Read() >> 2;

        // Add audio effect
        if (effect & LOW_PASS)
        {
            adcValue = low_pass(adcValue);
        }
        if (effect & PITCH_UP)
        {
            adcValue = pitch_up(adcValue);
        }
        if (effect & PITCH_DOWN)
        {
            adcValue = pitch_down(adcValue);
        }

        // Write to PWM
        PWM_Write(adcValue);

        // Clears the TIM2 interrupt pending bit
        TIM_ClearITPendingBit(TIM3, TIM_IT_Update);
    }
}

int main(void)
{
    // Initialize delay function
    DelayInit();

    // Initialize ADC, PWM, and GPIO
    ADC_Setup();
    PWM_Setup();
    GPIO_Setup();

    while (1)
    {
        // Read input switch (active low)
        effect = GPIO_ReadInputData(GPIOB);
        // Invert and mask input switch bits
        effect = ~effect & 0x7000;

        // If any audio effect is active, then turn on LED
        if (effect)
        {
            // Turn on LED (active low)
            GPIO_ResetBits(GPIOC, GPIO_Pin_13);
        }
        else
        {
            GPIO_SetBits(GPIOC, GPIO_Pin_13);
        }

        DelayMs(50);
    }
}

void ADC_Setup()
{
    ADC_InitTypeDef ADC_InitStruct;
    GPIO_InitTypeDef GPIO_InitStruct;

    // Step 1: Initialize ADC1
    RCC_APB2PeriphClockCmd(RCC_APB2Periph_ADC1, ENABLE);
    ADC_InitStruct.ADC_ContinuousConvMode = DISABLE;
    ADC_InitStruct.ADC_DataAlign = ADC_DataAlign_Right;
    ADC_InitStruct.ADC_ExternalTrigConv = DISABLE;
    ADC_InitStruct.ADC_ExternalTrigConv = ADC_ExternalTrigConv_None;
    ADC_InitStruct.ADC_Mode = ADC_Mode_Independent;
    ADC_InitStruct.ADC_NbrOfChannel = 1;
    ADC_InitStruct.ADC_ScanConvMode = DISABLE;
    ADC_Init(ADC1, &ADC_InitStruct);
    ADC_Cmd(ADC1, ENABLE);
    // ADC1 channel 1 (PA1)
    ADC_RegularChannelConfig(ADC1, ADC_Channel_1, 1,
        ADC_SampleTime_7Cycles5);

    // Step 2: Initialize GPIOA (PA1) for analog input
    RCC_APB2PeriphClockCmd(RCC_APB2Periph_GPIOA, ENABLE);
    GPIO_InitStruct.GPIO_Pin = GPIO_Pin_1;
    GPIO_InitStruct.GPIO_Mode = GPIO_Mode_AIN;
    GPIO_Init(GPIOA, &GPIO_InitStruct);
}

void PWM_Setup()
{
    TIM_TimeBaseInitTypeDef TIM_TimeBaseInitStruct;
    NVIC_InitTypeDef NVIC_InitStruct;
    TIM_OCInitTypeDef TIM_OCInitStruct;
    GPIO_InitTypeDef GPIO_InitStruct;

    // Step 1: Initialize TIM2 for PWM
    RCC_APB1PeriphClockCmd(RCC_APB1Periph_TIM2, ENABLE);
    // Timer freq = timer_clock / ((TIM_Prescaler+1) * (TIM_Period+1))
    // Timer freq = 72MHz / ((1+1) * (1023+1) = 35.15kHz
    TIM_TimeBaseInitStruct.TIM_Prescaler = 1;
    TIM_TimeBaseInitStruct.TIM_Period = 1023;
    TIM_TimeBaseInitStruct.TIM_ClockDivision = TIM_CKD_DIV1;
    TIM_TimeBaseInitStruct.TIM_CounterMode = TIM_CounterMode_Up;
    TIM_TimeBaseInit(TIM2, &TIM_TimeBaseInitStruct);
    TIM_Cmd(TIM2, ENABLE);

    // Step 2: Initialize PWM
    TIM_OCInitStruct.TIM_OCMode = TIM_OCMode_PWM1;
    TIM_OCInitStruct.TIM_OutputState = TIM_OutputState_Enable;
    TIM_OCInitStruct.TIM_OCPolarity = TIM_OCPolarity_High;
    TIM_OCInitStruct.TIM_Pulse = 0;
    TIM_OC1Init(TIM2, &TIM_OCInitStruct);
    TIM_OC1PreloadConfig(TIM2, TIM_OCPreload_Enable);

    // Step 3: Initialize TIM3 for timer interrupt
    RCC_APB1PeriphClockCmd(RCC_APB1Periph_TIM3, ENABLE);
    // Timer freq = timer_clock / ((TIM_Prescaler+1) * (TIM_Period+1))
    // Timer freq = 72MHz / ((1+1) * (1023+1) = 35.15kHz
    TIM_TimeBaseInitStruct.TIM_Prescaler = 1;
    TIM_TimeBaseInitStruct.TIM_Period = 1023;
    TIM_TimeBaseInitStruct.TIM_ClockDivision = TIM_CKD_DIV1;
    TIM_TimeBaseInitStruct.TIM_CounterMode = TIM_CounterMode_Up;
    TIM_TimeBaseInit(TIM3, &TIM_TimeBaseInitStruct);
    // Enable TIM3 interrupt
    TIM_ITConfig(TIM3, TIM_IT_Update, ENABLE);
    TIM_Cmd(TIM3, ENABLE);

    // Step 4: Initialize NVIC for timer interrupt
    NVIC_InitStruct.NVIC_IRQChannel = TIM3_IRQn;
    NVIC_InitStruct.NVIC_IRQChannelPreemptionPriority = 0x00;
    NVIC_InitStruct.NVIC_IRQChannelSubPriority = 0x00;
    NVIC_InitStruct.NVIC_IRQChannelCmd = ENABLE;
    NVIC_Init(&NVIC_InitStruct);

    // Step 5: Initialize GPIOA (PA0) for PWM output
    RCC_APB2PeriphClockCmd(RCC_APB2Periph_GPIOA, ENABLE);
    GPIO_InitStruct.GPIO_Pin = GPIO_Pin_0;
    GPIO_InitStruct.GPIO_Mode = GPIO_Mode_AF_PP;
    GPIO_InitStruct.GPIO_Speed = GPIO_Speed_2MHz;
    GPIO_Init(GPIOA, &GPIO_InitStruct);
}

void GPIO_Setup()
{
    GPIO_InitTypeDef GPIO_InitStruct;

    // Initialize GPIOC (PC13) for LED
    RCC_APB2PeriphClockCmd(RCC_APB2Periph_GPIOC, ENABLE);
    GPIO_InitStruct.GPIO_Pin = GPIO_Pin_13;
    GPIO_InitStruct.GPIO_Mode = GPIO_Mode_Out_PP;
    GPIO_InitStruct.GPIO_Speed = GPIO_Speed_2MHz;
    GPIO_Init(GPIOC, &GPIO_InitStruct);

    // Initialize GPIOB (PB12, PB13, PB14, PB15) for switch
    RCC_APB2PeriphClockCmd(RCC_APB2Periph_GPIOB, ENABLE);
    GPIO_InitStruct.GPIO_Pin = GPIO_Pin_12 | GPIO_Pin_13 |
    GPIO_Pin_14 | GPIO_Pin_15;
    GPIO_InitStruct.GPIO_Mode = GPIO_Mode_IPU;
    GPIO_InitStruct.GPIO_Speed = GPIO_Speed_2MHz;
    GPIO_Init(GPIOB, &GPIO_InitStruct);
}

uint16_t ADC_Read()
{
    // Start ADC conversion
    ADC_SoftwareStartConvCmd(ADC1, ENABLE);
    // Wait until ADC conversion finished
    while (!ADC_GetFlagStatus(ADC1, ADC_FLAG_EOC));

    return ADC_GetConversionValue(ADC1);
}

void PWM_Write(uint16_t val)
{
    // Write PWM value
    TIM2->CCR1 = val;
}

uint16_t low_pass(uint16_t input)
{
    int i;
    static float buffer[FILTER_BUF];
    uint16_t result;

    for (i = (FILTER_BUF-1); i > 0; i--)
    {
        buffer[i] = buffer[i-1];
    }
    buffer[0] = input;

    for (i = 0; i < FILTER_BUF; i++)
    {
        result += buffer[i] * filter_coeff[i];
    }

    return result;
}

uint16_t pitch_up(uint16_t input)
{
    static int index_wr = 0;
    static int index_rd = 1;
    static uint16_t buffer[PITCH_BUF];

    buffer[index_wr] = input;

    index_rd += 2;
    if (index_rd >= (PITCH_BUF-1))
    {
        index_rd = 0;
    }
    index_wr++;
    if (index_wr >= (PITCH_BUF-1))
    {
        index_wr = 0;
    }

    return buffer[index_rd];
}

uint16_t pitch_down(uint16_t input)
{
    static int index_wr = 0;
    static int index_rd = 1;
    static uint8_t half = 0;
    static uint16_t buffer[PITCH_BUF];

    buffer[index_wr] = input;

    half++;
    if (half == 2)
    {
        index_rd++;
        half = 0;
    }
    if (index_rd >= (PITCH_BUF-1))
    {
        index_rd = 0;
    }
    index_wr++;
    if (index_wr >= (PITCH_BUF-1))
    {
        index_wr = 0;
    }

    return buffer[index_rd];
}
First, we must initialize peripherals that will be used: ADC, PWM, Timer, and GPIO. The code in main loop is for read button and controlling LED indicator. The button is used for select audio effects. In the timer 3 ISR, we put code for read ADC value, process the value, and output the value to the PWM output.
This code below is used for implementing low-pass filter audio effect. The filter coefficient is obtained using MATLAB. The order of the filter is 7 and the cut off frequency is 800Hz.
/* Low pass filter coefficient (frequency cutoff = 800Hz)
 * Matlab code:
 * N = 7; f_lp = 800; fs = 35156;
 * Wn = f_lp/(fs/2);
 * B = fir1(N, Wn, 'low');
 * freqz(B);
 */
const float filter_coeff[FILTER_BUF] =
{
    0.0200, 0.0647, 0.1664, 0.2489, 0.2489, 0.1664, 0.0647, 0.0200
};

uint16_t low_pass(uint16_t input)
{
    int i;
    static float buffer[FILTER_BUF];
    uint16_t result;

    for (i = (FILTER_BUF-1); i > 0; i--)
    {
        buffer[i] = buffer[i-1];
    }
    buffer[0] = input;

    for (i = 0; i < FILTER_BUF; i++)
    {
        result += buffer[i] * filter_coeff[i];
    }

    return result;
}
This code below is used for implementing pitch up and pitch down effect. This code is re-write from this project by Anders Skoog.
uint16_t pitch_up(uint16_t input)
{
    static int index_wr = 0;
    static int index_rd = 1;
    static uint16_t buffer[PITCH_BUF];

    buffer[index_wr] = input;

    index_rd += 2;
    if (index_rd >= (PITCH_BUF-1))
    {
        index_rd = 0;
    }
    index_wr++;
    if (index_wr >= (PITCH_BUF-1))
    {
        index_wr = 0;
    }

    return buffer[index_rd];
}

uint16_t pitch_down(uint16_t input)
{
    static int index_wr = 0;
    static int index_rd = 1;
    static uint8_t half = 0;
    static uint16_t buffer[PITCH_BUF];

    buffer[index_wr] = input;

    half++;
    if (half == 2)
    {
        index_rd++;
        half = 0;
    }
    if (index_rd >= (PITCH_BUF-1))
    {
        index_rd = 0;
    }
    index_wr++;
    if (index_wr >= (PITCH_BUF-1))
    {
        index_wr = 0;
    }

    return buffer[index_rd];
}
This is the result:


thanks
ReplyDeleteWow. I love it.
ReplyDeleteCan you explain how to add a pot to get a variable filter instead of a fixed 800mhz?
I think I need some array.
Thank you
Great article. I Will try to make some experiments with this cheap card. Thanks. Giuseppe.
ReplyDeleteExcellent, Great article.
ReplyDeleteNice article thank you.
ReplyDeleteIn some cases I do not quite understand your coding. For ex. in function low_pass() it looks to me that you are refering unintiliazed variables. First time when the function is called you are copying values from buffer[], but what are those values?
You are also adding values to variable result but this local variable is not initiliazed when you use it first time.
Even though there might be a compiler switch that is used to initiliaze all the variables to zero, this kind of coding is not portable. I prefer to initiliaze all the variables before using them. In this case I would write
static float buffer[FILTER_BUF] = {0.0};
uint16_t result = 0;
which causes no extra run time instructions but makes the code much more easier to use in other environments.
Not sure if you understand digital signal processing. The low pass filter uses current and past values of the signal for which a buffer, rather a queue of samples is used with fixed length. Old guys go out and new guys come in. And the output is a weighted average of the samples to do a low pass filter. The weights determine the filter cut off.
Deletewhat program for use?
ReplyDeleteuVision 5
DeleteThis comment has been removed by the author.
ReplyDeleteI TRIED BUT AM GETTING FULL NOISE NO AUDIO ...
ReplyDeleteCAN YOU PLEASE HELP ME OUT...
THANK YOU
Special THANK YOU .
ReplyDeletePlease upload the HEX application.
TNX.
ReplyDeletePlease also upload its libraries. Thank you
why the 10-bit resolution if the ADC supports 12?
ReplyDelete